


DIY Litterless Lunchboxes

If you have kids that have been in school for a couple years, then you’re probably already very familiar with the idea of the litterless lunch. For those newer to the school lunch game, the goal is for kids to have a waste-free lunch experience by making thoughtful choices on what they eat and how it’s packaged, and this extends to your own lunchbox as well! There are a lot of ways that this can be done, and contrary to popular belief, it doesn’t take a huge investment in fancy silicon pouches or other expensive reusables to make it happen (although, if that is what works for you, rock on!).
Read on for some easy tips on making a litterless lunch, including what to eat, what to pack it in, and how to clean and maintain the reusable packaging.
What To Pack in a Litterless Lunchbox
One great side effect of litterless eating is how it encourages fresh, healthy, whole food choices. Most processed foods come with excess packaging, so you’re going to have to look at different snack options but usually you can create your kids favourite processed foods with healthier homemade choices. This does mean you are going to have to do more planning, but it will be worth it! One important thing to remember here is that these do not need to be Pinterest-worthy, Instagrammable, perfect lunchboxes. Most kids aren’t too fussed about what it looks like, as long as it tastes great and delivers the nutrients your little ones need!
Planning lunches for the week is a great time to get the kids involved. It allows them to understand both the work that goes into keeping them fed and is the perfect time for discussions on healthy eating, what that means, and why it’s important.
The most obvious options for waste-free lunches are fruits and vegetables, as they often come with their own biodegradable packaging! Going litterless is great for using leftovers as well as buying bigger containers of things like yogurts, apple sauce, and crackers, and putting them in smaller reusable containers. Stews, chilis or curries that can be made at the beginning of the week and kept fresh in the fridge or freezer for use throughout the week are also a great option. Sandwiches and wraps are always popular, and a favourite snack that’s easy to make at home is the granola bar.
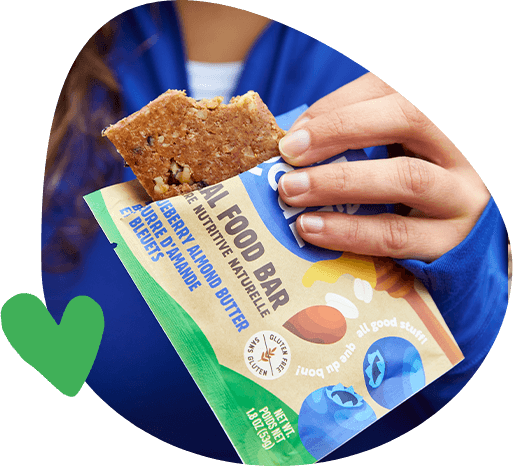
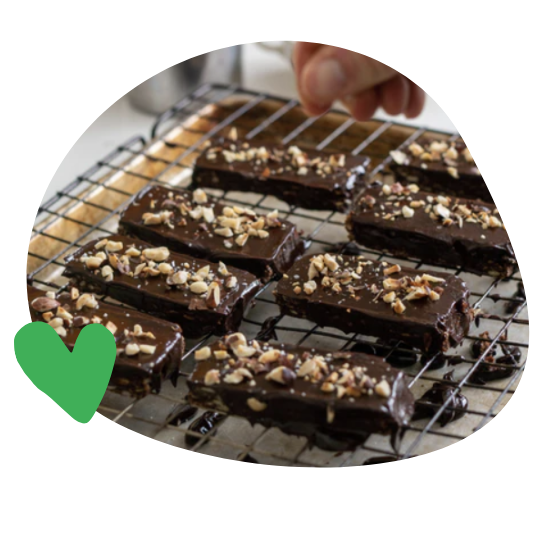
Made with Local Granola Bars
Made With Local has three great options to make homemade bars using our Granola Bar Mix! Made with organic whole grains, dried fruit, seeds and more – just add your favourite school-safe seed butter or WowButter and honey or maple syrup and a few minutes time in the oven (10 minutes), and you have a week’s worth of great snacks! We’ve just launched an 8-Pack Granola Bar Mix Bundle to help make your meal planning even easier for this school year, which comes with a special recipe book with delicious ideas like dreamy chocolate fudge bars.
What To Pack Litterless Lunch In
There are lots of products out the to help you put together lunches, including stainless-steel bento boxes, snack pouches, bamboo cutlery, reusable straws, and more. But, if you look around the house, you probably already have what you need on hand, without needing to spend a fortune.
Who doesn’t have reusable plastic containers hanging around in a variety of shapes and sizes (that is, if you can find a lid that matches a container!)? They can be used with sandwiches, leftovers, salads and snacks; almost anything really. It is also easy to make reusable sandwich and snack bags at home – like these three great blogs that guide you through the process. This one uses a strip of velcro to close the bag, this one uses a velcro dot, and this one uses zippers!
Most kids have their own water bottle from a young age, as it’s not only environmentally friendly, but a good way to keep germs from spreading through shared drinks. If your child doesn’t already have one, stainless steel is considered the best option as they have the added benefit of being BPA-free. You don’t have to splurge on a name-brand water bottle either (especially considering how often kids tend to misplace things); there are lots of cheaper versions that work just as well without hurting the wallet.
Some other options include mason jars and beeswax food wraps. Though a little heavy, mason jars work well for older kids and can carry almost anything securely. Reusable beeswax wraps can also be used for sandwiches, cut fruits and vegetables, and even homemade goodies like squares, cookies, bars, or crackers. You don’t have to spend a fortune buying them either, there are lots of great DIY tutorials to make your own, like this one, this one, or this one. If none of those work for you, there are many more on Pinterest!
How To Keep Your Litterless Lunchbox Clean
Keeping reusable packaging clean is an important step. Some items are easy, like plastic containers, mason jars, reusable cutlery, and bento boxes, which can all be safely washed in the dishwasher. Snack pouches and lunch bags can usually be thrown in the washing machine though it’s best to turn them inside out, or they can be wiped down with warm, soapy water and left to dry inside out.
Some things are a bit trickier. If you have reusable straws, you’re going to need to clean them by hand with a straw brush. Beeswax wraps are currently all the rage but take some care. They need to be washed by hand in cold water or else the resin/wax will melt off. This means they can’t be used for items like meat or fish and they might work better with a rubber band to keep the seal.
No matter what you have on hand or what you want to buy, you always have some options to create lunches and snacks that focus on reducing waste. It doesn’t have to start completely waste-free either. Take what you have, plan your options, and move forward; picking up the best solutions for your situation along the way. As I’m sure you’ve told your kids, every little bit helps!
